A DIY Project you’ll Love
By Hend Seif El Din
 Gather the Corks. If you want a proper-sized bathmat, you’ll need around 180 corks, so start collection. Other than “finding” them, some craft and supply stores sell them, too. You could also try asking restaurants and cafés to keep their corks for you instead of throwing them out. Before starting your project, do make sure that they’re completely dry.
Slice each Cork in Half.Note that you should slice the corks lengthwise, and be careful; cutters can be very sharp, and we wouldn’t like to see you hurt yourself. Use a non-slip surface during the process as well.
 Create your Base.Use an old (or new) shower mat as your base; opt for a rubber shower mat if possible, as it will ensure the proper structure. You could also use water-resistant wood for a more solid surface. Lay your chosen mat on the floor or any flat surface, but be careful not to slash your floor, maybe cutting it outside is your best option.
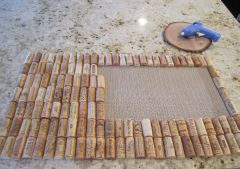
Arrange the Cork Halves around the Perimeter. Start by creating a border of cork halves, lining them up vertically along the edges. Make sure that the bottom of each cork (i.e. its end) bumps against the sides of the mat. Now, continue doing the same until the entire mat has been lined with cork-halves. Using your glue gun, apply hot glue to the flat side of each half-cork and press it into the mat. Also, use a dab of hot glue at the top and bottom of each one to ensure the whole structure sticks together. Then, wipe off any excess glue; you have to move quickly though because hot glue dries very quickly. Don’t burn your fingers though! Use an old rag to do the latter; do not touch the glue directly with your fingers until it’s dry.
 |  |
Add Remaining Corks.Get creative! Create a design and/or pattern with the cork layout, working your way from the perimeter inward with the remaining pieces of half-corks. Go for either a vertical or a horizontal pattern. Do consider laying the cork halves first before gluing any of them to the mat, to make sure they fit and that you like the design. If needed, trim the corks that stick out too much or don’t fit properly Allow your Cork Mat to Dry Completely.Do consider applying a coat of protective sealant across the top of your mat to waterproof it. If you chose not to do the latter, don’t fret! Cork mats can survive a certain amount of liquid, assuming you don’t soak them. Also, to avoid the risk of mildew growth, do leave your mat out in the sun for a few hours once a month


